Posts Tagged With: photoshop tutorials

#9: How to Look Like a Photoshop Pro–in Fifth Grade

imagesBefore trying this lesson, start with Photoshop for Fifth Graders: The First Step is Word, Autofixescloning, and cropping. Don’t worry. It’s not hard–just the basics.

Ready? Let’s start with what Adobe Photoshop is–a grown-up KidPix, and the default photo-editing program for anyone serious about graphics. This series of projects (available in 55 Technology Projects for the Digital Classroom Volume I) introduces students to a traditionally-challenging program in an easy to understand way, each scaffolding to the next, thus avoiding the frustration and confusion inherent in most Photoshop training.

Adobe Photoshop has an impressive collection tools to add pizazz to pics. Have students open their school picture for this project (I’ll use a horse). They love working with their own image.

  • #1: Artistic Renderings—artistic overlays that add flair to pictures. Go to Filter—artistic and it brings up dozens of choices. Try some (it gives a preview of the result) and select a favorite.

image5

image2

image1

  • #2: blur and smudge tools on left tool bar to soften the background, and sharpen a focal point.

image1

  • #3: Use Filter-render-clouds to create a cloudy background (the colors of your foreground and background tool)

image1

  • #4: Use the transparency tool to adjust image visibility. Select one picture for the background (Pool Girl). Add another picture as a layer on top (Swimming Dog) and adjust its transparency so that the under layer shows through.

image1

Troubleshooting Tips

  • I can’t get the right colors for the clouds (check your foreground and background tools. That’s where Photoshop takes the colors)
  • I’m trying to drag the picture but I get an error message (Check your layers. Do the have the correct layer highlighted?)
  • I don’t have Photoshop. (Try GIMP–it’s free)

Do you have questions? Please add a comment and I’ll answer. Thanks.

Follow me

Share

Categories: fifth grade, lesson plans, middle school technology, photo editing, Photoshop, teacher resources, Tech | Tags: , , , , , , , , | 1 Comment

Fifth Grade Photoshop: Change That Background

This one you already know how to do if you’ve been following along. Because it is a must-have in a school environment, I’m going to step it out for you.

  • Have your child or students open a photo of themselves in Photoshop
  • Use the cropping tools learned here to crop themselves out of the background
  • Go to select-inverse to select the individual rather than the background
  • Edit-copy (this will copy the student’s cropped picture)
  • Open a picture of the background they’ve chosen
  • Edit-paste the picture they cropped into the background
Dog pasted in front of pyramids

Dog pasted in front of pyramids

Dog pasted in front of Stonehenge

Dog pasted in front of Stonehenge

Imagine, putting your students in the historic events you study together, in the landforms they learn about in science, or the natural math that appears in nature. Now, with this Photoshop lesson, that’s all possible.

PS–If you don’t have Photoshop, try the free download called GIMP.

–from 55 Technology Projects for the Digital Classroom. Preview available on Amazon.com and Scribd.com

Add to FacebookAdd to DiggAdd to Del.icio.usAdd to StumbleuponAdd to RedditAdd to BlinklistAdd to TwitterAdd to TechnoratiAdd to FurlAdd to Newsvine

Categories: fifth grade, free tech resources, photo editing, Photoshop, teacher resources, teaching | Tags: , , , , | 1 Comment

Fifth Grade: Custom Shapes in Photoshop

Custom shapes are great fun in Photoshop, and one of the simplest skills to learn.

#1--select 'custom tool' and the 'shape'

#1--select 'custom tool' and the 'shape'

  • Open a picture in Photoshop
  • Select the ‘custom shape tool on the left and again at the top (see example)
  • Select the tool you’d like (crowns, fences, borders–I’ve selected a border and a frame)
  • After you add a custom tool, select the ‘style’ at the top (see example
  • Save, print. You’re done
#2--Add a fence, frame and style (color)

BTW–I used Jing to grab the screen shots, add the arrows. Jing is a free download that’s better than Printkey, not quite as fast, but available online for free (something Printkey got away from).

Categories: fifth grade, free tech resources, internet, K-5 Tech training, lesson plans, photo editing, Photoshop, teacher resources | Tags: , , , , , | 3 Comments

Photoshop for Fifth Graders: the Basics

As with all lessons in the Photoshop series, this is available in the book, 55 Technology Projects for the Digital Classroom Volume I on publisher’s website, Amazon.com or Scribd.com as an ebook)

Animated-Border-Flags

Before I continue, I’m going to cover some basics (I heard y’all. I should have done this weeks ago).image1

Open Photoshop. Notice the tool bars at the top. These will change depending upon the tool you choose from the left side. These are the crux of Photoshop. We’ll cover about ten of them in fifth grade. The rest will have to wait. The right-hand tools are used independent of the left-hand tools. They are more project oriented.

  • Click the File Browser tool  (top right-ish). It shows you the folders on your computer. From here, you can select the picture you’d like to edit (or use File-open) Continue reading
Categories: fifth grade, free tech resources, homeschool, K-5 Tech training, photo editing, Photoshop, teacher resources, Tech | Tags: , , , , , , , , , , , , , | 4 Comments

#8: Fifth Grade Cloning in Photoshop

clone3Adobe Photoshop is kind of like KidPix for grown-ups, as well as the default photo-editing program for anyone serious about graphics. This series of projects (available in the first volume of the book, 55 Technology Projects for the Digital Classroom) introduces students to a traditionally-challenging program in an easy to understand way, each project scaffolding to the next, thus avoiding the frustration and confusion inherent in most Photoshop training.

We’ve already completed Word image editing basics here and Photoshop autofixes here. This one on cloning is going to be a favorite of your children.

The clone tool  duplicates a hard to crop-and-copy image (like the flowers below) or deletes part of a background—a sign or a post in a nature scene—you don’t want there. You can clone within a picture (as with the flowers),

clone1

or from one picture to another (adding polar bears to the sea cave).

clone2

  • To duplicate part of a picture, select the clone tool in the left hand tool bar and create an anchor point on a flower or the polar bears with Ctrl+Click. Now paint (click and drag) with the mouse where you want to clone it. That can be within the picture that’s already open or in a second picture (like cloning polar bears to the sea cave)
  • To delete part of a picture (such as the flowers), set the anchor point on the green field. Click on a flower and paint over it with the green field until the flowers melt into the background. Be sure to pay attention to shadows, obstructions, etc., so the deletion appears seamless.

Troubleshooting Tips

  • It doesn’t look right. (check your starting point. Does it match the color and shade of the end point? Have you picked up any extras in the clone process?)
  • I’m trying to drag the picture but I get an error message (Check your layers. Do the have the correct layer

For a few more hints, check out the lesson plan on Scribd.com

Add to FacebookAdd to DiggAdd to Del.icio.usAdd to StumbleuponAdd to RedditAdd to BlinklistAdd to TwitterAdd to TechnoratiAdd to FurlAdd to Newsvine

Categories: fifth grade, free tech resources, homeschool, lesson plans, photo editing, Photoshop, teacher resources | Tags: , , , , , , , | 7 Comments

#6: Photoshop for Fifth Graders–Autofixes

We started with a list of Photoshop skills your fifth graders can accomplish. Yesterday we used MS Word for basic skills. You’re now ready for the one all the pros use: Adobe Photoshop.

Before I start, Adobe offers huge education discounts for Photoshop. If you don’t own it and your child likes art, graphics, computers, check it out. There’s also a open source version of Photoshop, but it escapes me at the moment. If you know that link, let me know and I’ll pass it on.

  • Open a picture in Photoshop
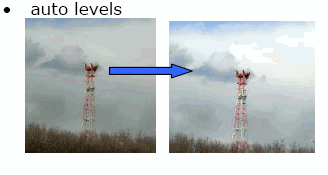
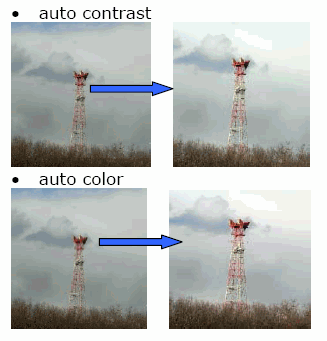
  • Go to ‘image-adjustments’. Try each of the ‘auto’ selections.
  • For example, click ‘auto levels’. The picture will change.
  • If you’re not sure about the ‘fix’, go over to the right side to the ‘history’ tab. It shows the last twenty-ish steps you’ve taken to format your picture. Click back to the original picture (at the top) and see the difference. You can click between the original picture and the step you’re at without loosing anything.

Here’s an example:

autoa

auto

Next, I’ll show you how to crop with the lasso and the magic wand.

–from 55 Technology Projects for the Digital Classroom. Preview available on Amazon.com and Scribd.com

Add to FacebookAdd to DiggAdd to Del.icio.usAdd to StumbleuponAdd to RedditAdd to BlinklistAdd to TwitterAdd to TechnoratiAdd to FurlAdd to Newsvine

Categories: fifth grade, fourth grade, free tech resources, homeschool, lesson plans, Photoshop, teacher resources | Tags: , , , , | 11 Comments

Use Your Computer Like a Pro–in fifth grade

The program that says ‘pro’ more than any other is Adobe Photoshop. Believe it or not, there are a whole list of skills easy enough for a fifth grader (maybe even fourth, but I haven’t had time to test it on them yet). Here they are:

Over the next few weeks, I’ll show you how to do each of these skills. Don’t worry–they’re not nearly as hard as people say they are!

First though, we start with MS Word’s graphic editing tools.

Add to FacebookAdd to DiggAdd to Del.icio.usAdd to StumbleuponAdd to RedditAdd to BlinklistAdd to TwitterAdd to TechnoratiAdd to Furl

Categories: fifth grade, homeschool, K-5 Tech training, Photoshop, teacher resources, teaching | Tags: , , , , , , , , , , , , | 2 Comments

Website Powered by WordPress.com.